A major renovation is a temporary disruption in exchange for a long-term upgrade. That framing is true, and it is also the thing people forget somewhere around week three, when the coffee maker is on the washing machine and the dog has decided the tile saw is an existential threat.
The households that come through a remodel well are not the ones with the most patience. They are the ones that prepared on two tracks at once: the physical preparation of the house, and the preparation of the routine that has to keep running inside it. Here is how to do both.
Quick takePreparing for a remodel takes two parallel plans. Physical prep means clearing the zone, professional dust containment, protected walking paths, and a temporary kitchen. Routine prep means site rules, pet and child safety zones, a communication cadence with your project manager, and realistic expectations about noise hours. Doing both reduces delays, change orders, and friction with your crew.
- First decision: stay or move out?
- Physical preparation: protecting your home and belongings
- Setting up a temporary kitchen
- Preparing your family, pets, and routine
- Know the legal work hours in your city
- Ground rules and builder communication
- The 7-day pre-demolition checklist
- Frequently asked questions
- Partner with a builder who respects your home
First decision: stay or move out?
Everything else follows from this one, so make it early and honestly.
You can usually stay for single-room projects where the rest of the house keeps working: a secondary bathroom, a kitchen update where you can set up elsewhere, or a phased addition that leaves your plumbing, heat, and power intact. A bathroom remodel typically runs about 4 to 10 weeks and a kitchen about 6 to 16 weeks, which is a long time to live around a project but a manageable one when the rest of the house functions.
You should plan to move out for whole-house gut renovations, main sewer line or electrical panel replacements, and heavy structural work. If the project means extended stretches without a working kitchen, bathroom, heat, or power, or sustained heavy dust, staying is not thrift, it is a health and safety problem. Whole-home renovations commonly run 6 to 12 months, which is a different scale of decision entirely.
The honest cost-benefit. Temporary housing in King County is expensive, and that number is easy to see. What is harder to see is the cost of staying: crews lose time every day setting up and breaking down containment, protecting paths, and working around occupied rooms, and some trades simply cannot run at full speed with a family in the house. Ask your builder directly how occupancy affects your schedule and your price, then compare that against rent for the real project duration rather than the optimistic one.
Physical preparation: protecting your home and belongings
Clear the zone, and then clear more than the zone. Empty the work area completely, then deal with the rooms sharing walls with it. Framing, demolition, and tile removal transmit real vibration through structure, and the casualties are almost always the things nobody thought about: framed art on the shared wall, glassware in a cabinet backing the work zone, a heirloom on a shelf two rooms away. Take them down before day one.
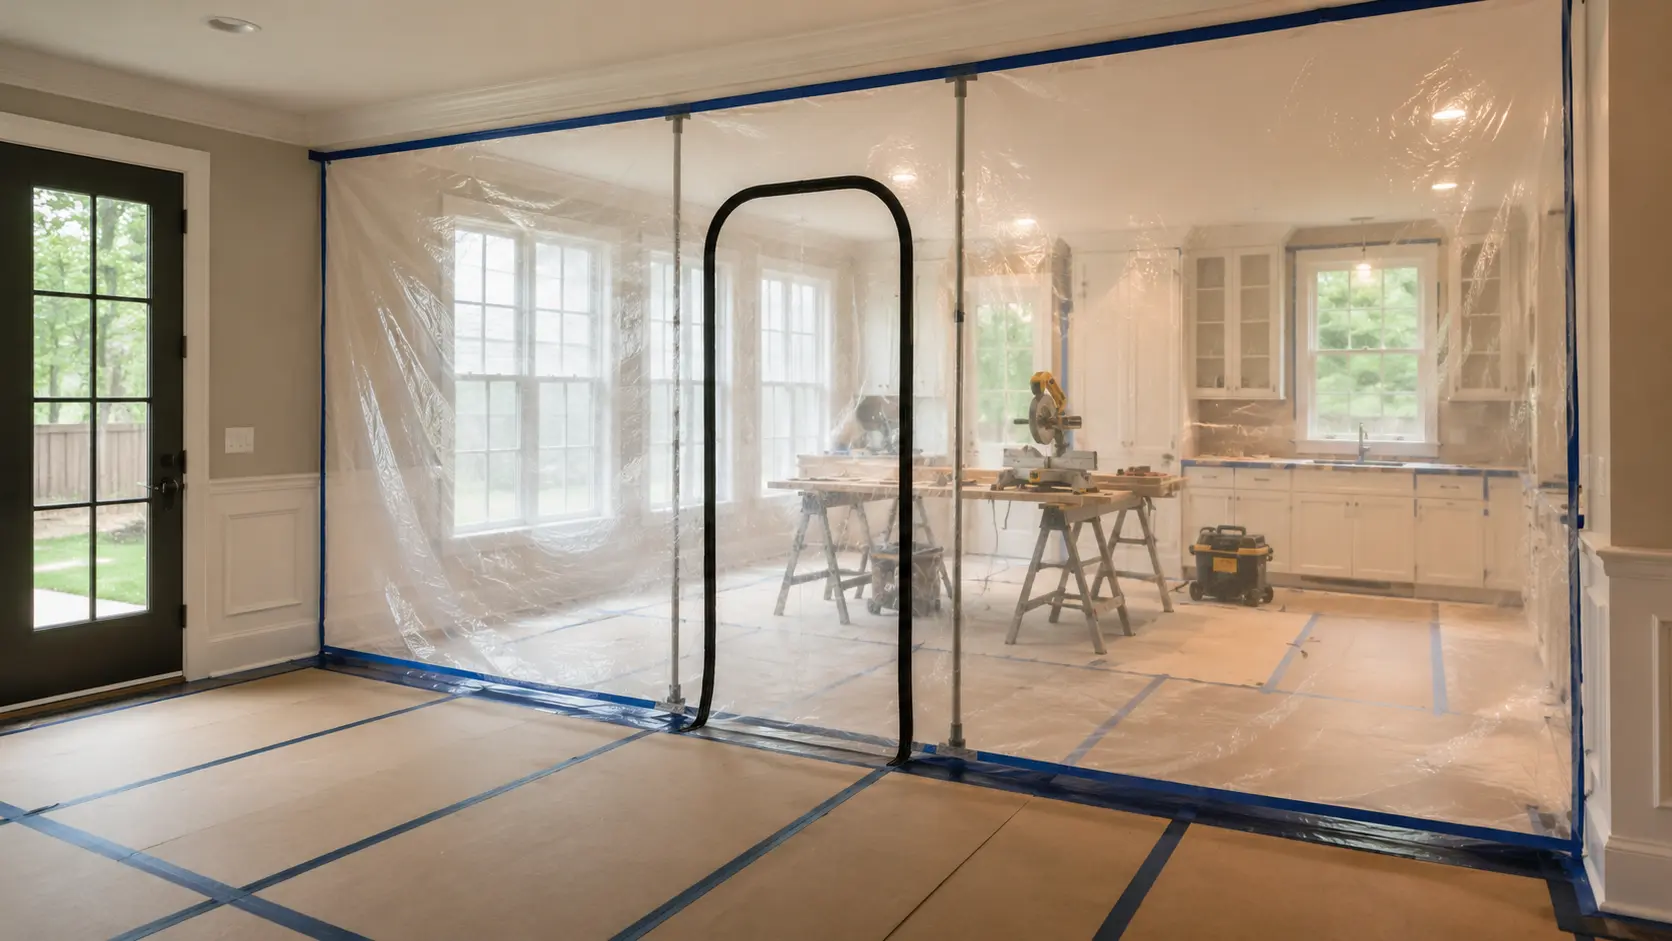
Insist on professional dust containment. This is the single clearest signal of a serious contractor. Floor-to-ceiling containment systems with zippered doorways, negative air machines that keep the work zone at lower pressure than your living space so dust moves outward rather than inward, and sealed HVAC returns in the work area so your furnace does not distribute drywall dust through the whole house.
Protect the paths of travel. Crews will walk the same route dozens of times a day carrying heavy, sharp things. Hardboard or heavy-duty floor protection over hardwood, and adhesive film over carpet in entryways and hallways. Agree on the route before work starts so it does not get improvised.
Designate storage. Decide early where materials stage and where your packed belongings go. A portable storage container on the driveway or a cleared garage bay prevents the slow creep of boxes into the rooms you are still living in.
Setting up a temporary kitchen
If the kitchen is the project, this determines your quality of life for months.
Relocate the essentials. A mini fridge, microwave, toaster oven, hot plate, kettle, and coffee maker, set up in a dining room, basement, or laundry area. Test the outlets first: a microwave and a hot plate on the same circuit will trip a breaker repeatedly, and finding that out on day one is much better than during dinner on day ten.
Solve dishwashing. A utility sink, a laundry sink, or a bar sink becomes your dish station. Many households lean on disposable plates and cutlery through the heaviest weeks, which is a reasonable trade if you choose compostable options.
Plan the food. Batch-cook and freeze meals before demolition day, and budget honestly for takeout. Increased restaurant spending is a real line item in a kitchen remodel that almost nobody puts in the budget.
Preparing your family, pets, and routine
| Focus area | What to do before work starts |
|---|---|
| Kids and safety | Establish strict off-limits zones with physical gates, not just verbal rules. Explain plainly that tools and materials are dangerous and the work zone is not a play area. |
| Pets and anxiety | Set up a secure interior room away from the crew's entry route. For heavy demolition days, day care or boarding is kinder than white-knuckling it. Check yard gate latches, because doors get propped open. |
| Daily schedules | Crews typically arrive between 7:00 and 8:00 AM. Align showers, school runs, and departures with that, and sort out where trucks park before day one. |
| Working from home | Designate a room with a solid door as far from the work as possible, and plan to work elsewhere during framing, tile sawing, and demolition. Those days are not conference-call compatible. |
The pet point deserves emphasis. The most common preventable incident on a residential jobsite is a pet escaping through a door left open for material runs. Introduce your animals to the entry route, tell the crew which pets live in the house, and put a sign on the door they use.
Know the legal work hours in your city
This is worth knowing before you sign, because it sets expectations for both you and your neighbors, and the rules differ meaningfully across the region.
In Seattle, general construction noise is permitted 7:00 AM to 10:00 PM on weekdays and 9:00 AM to 10:00 PM on weekends and legal holidays. In lowrise, midrise, highrise, residential-commercial, and neighborhood commercial zones, the window narrows to 7:00 AM to 7:00 PM weekdays and 9:00 AM to 7:00 PM weekends. Impact construction such as jackhammering is restricted further, to 8:00 AM to 5:00 PM weekdays and 9:00 AM to 5:00 PM weekends.
In Bellevue, construction noise is permitted 7:00 AM to 8:00 PM weekdays and 8:00 AM to 6:00 PM Saturdays, with none permitted on Sundays or legal holidays without a city-approved permit. Residential noise limits sit at 55 dBA during the day and 45 dBA at night.
Other King County jurisdictions set their own hours, so confirm yours. Knowing the window tells you when your house will be loud, and gives you a factual answer when a neighbor asks.
Ground rules and builder communication
Jobsite access. Decide how crews get in. A smart lock code you can change or a lockbox is far better than a hidden key or someone being home to open the door. Settle parking too, since a crew of trades arriving in separate trucks is a real presence on a residential street.
Restroom and utilities. Confirm whether crews will use a designated interior bathroom or an on-site portable toilet. On longer projects, most households prefer the portable option. Also clarify who pays for the power and water the project uses, which is normally you.
Communication cadence. Set a weekly formal check-in with your project manager and agree on one channel for non-urgent questions, whether that is a project app, email, or a shared thread. The reason this matters more than it sounds: informal requests made to a carpenter in passing are how unpriced scope changes enter a project. Route decisions through one person and get changes in writing.
If you want to see how a structured process handles all of this, our how it works page walks through the stages.
The 7-day pre-demolition checklist
Work through these in the week before demolition.
- [ ] Clear all items from walls that share framing with the construction zone, including the far side.
- [ ] Set up the temporary kitchen and test the outlets under real appliance load.
- [ ] Move outdoor furniture, planters, and vehicles away from the staging and dumpster area.
- [ ] Walk the crew's entry route with your pets, and double-check every yard gate latch.
- [ ] Notify immediate neighbors about delivery trucks, dumpster placement, and expected noise.
- [ ] Confirm access method, parking, and restroom arrangements in writing.
- [ ] Pack and remove anything irreplaceable from the work zone and adjacent rooms.
- [ ] Photograph existing conditions in and around the work area for your own records.