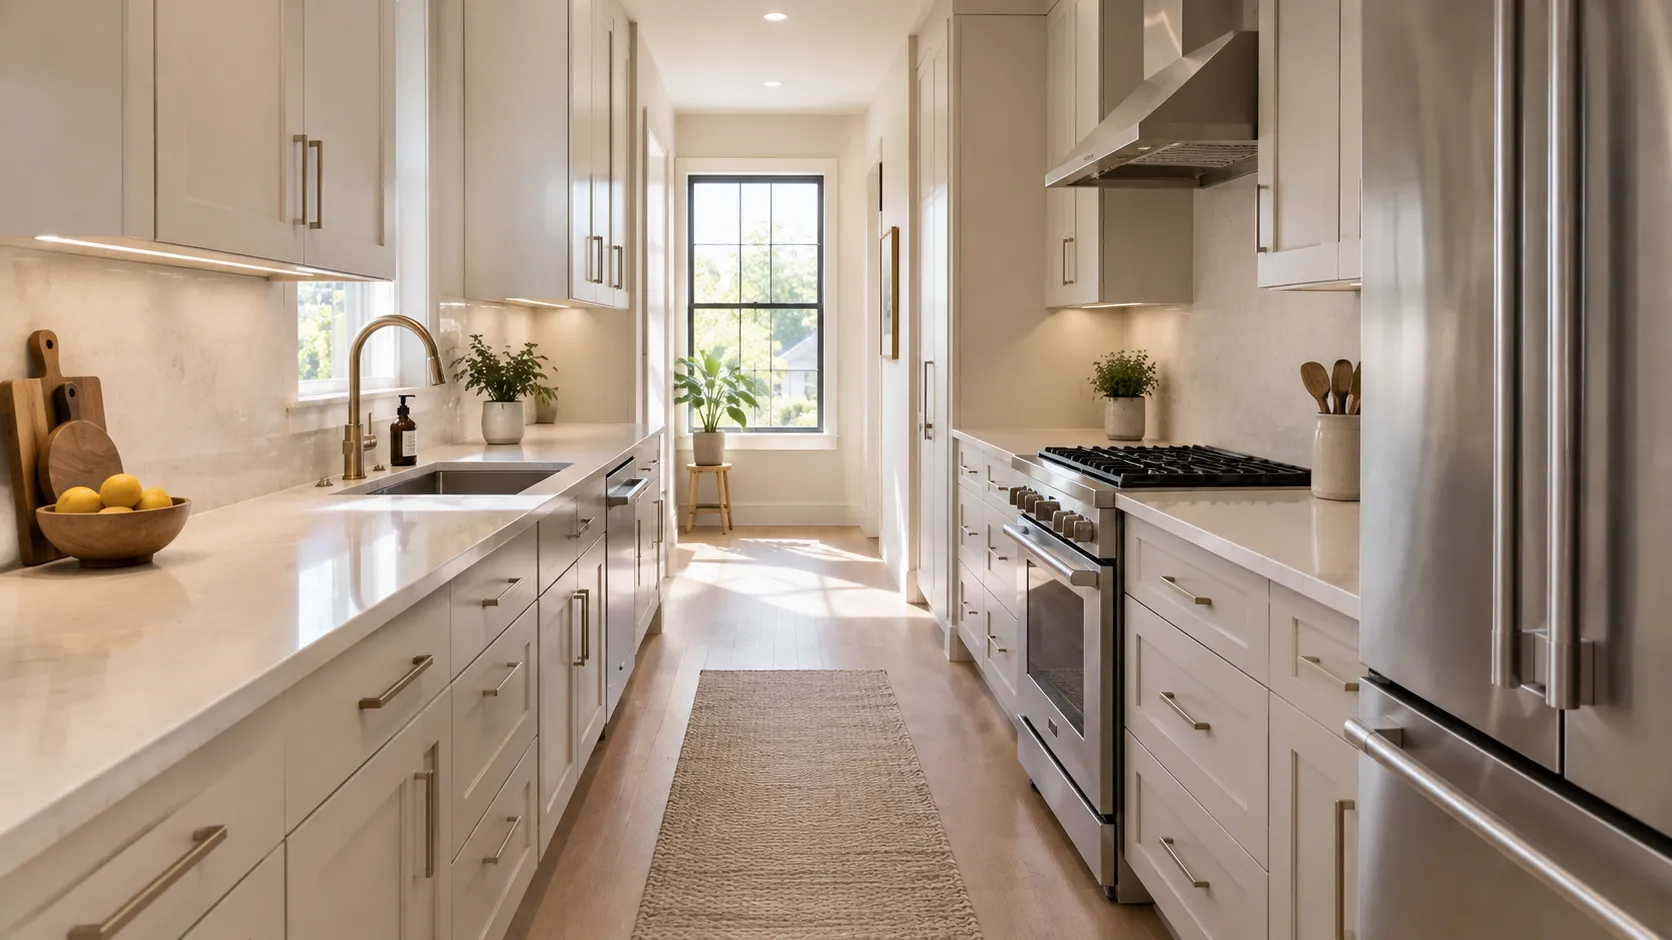
The galley gets a bad reputation it does not deserve. Two parallel runs facing each other is the most efficient kitchen geometry ever drawn, which is exactly why commercial kitchens and boat galleys use it. Everything is within a pivot. Nothing is a walk.
What makes a galley miserable is not the shape. It is a handful of dimensional decisions that went wrong, usually in the same predictable ways. Get those right and a narrow kitchen stops feeling like a hallway with appliances in it.
These nine ideas are in deliberate order. The first five are dimensional and they decide whether the kitchen works. The last four are visual and they decide whether it feels open. Doing the second group without the first is how you get a narrow kitchen that photographs beautifully and is unpleasant to cook in.
Quick answerA galley kitchen needs a work aisle of 42 inches for one cook or 48 inches for two, measured from counter face to counter face. The constraint most plans miss is appliance door interference: a dishwasher needs 27 to 30 inches in front of it to open and load, so in a 42 inch aisle an open dishwasher door leaves only about 12 to 15 inches of passage. The fixes that buy the most room are reduced-depth cabinets on one run, a counter-depth refrigerator, and staggering opposing appliances so their doors never face each other.
- 1. Settle the aisle before anything else
- 2. Give the two runs two different jobs
- 3. Make one run shallower
- 4. Choose a counter-depth refrigerator
- 5. Stagger the appliances that face each other
- 6. Run one continuous countertop the full length
- 7. Make the two walls asymmetrical
- 8. Run the flooring down the long axis
- 9. Light the length, not the middle
- Putting the nine in order
- Frequently asked questions
- The shape is not the problem
1. Settle the aisle before anything else
Everything in a galley is downstream of one number. The work aisle, measured from the face of one counter to the face of the counter opposite, should be 42 inches for a single cook and 48 inches where two people work at once, per the NKBA planning guidelines. A pure walkway with no appliances or work surface can drop to 36 inches, but that is a corridor, not a kitchen.
Measure between the things that actually project: counter edges, tall cabinets, and appliance fronts. Not wall to wall. A 10 foot wall to wall galley with 25 inch counters on both sides has an aisle of 70 inches, which is generous. An 8 foot galley has 46 inches, which is workable. A 7 foot 6 inch galley has 40 inches, which is where the compromises start.
One precision note, because it gets misquoted constantly: the 60 inch minimum between opposing arms in the accessibility standards applies to U-shaped kitchens, not galleys. A galley is governed by the work aisle figure, not by that 60 inch rule. If someone tells you your galley is non-compliant at 48 inches, they are applying the wrong guideline.
For the full set of clearance figures, including walkways, seating and landing areas, we laid them out in our kitchen clearance and dimensions guide.
2. Give the two runs two different jobs
This is the single most underused galley idea, and it costs nothing.
In a galley, every time two activities happen on the same wall, two bodies end up in the same four feet of aisle. The fix is to split the kitchen by function rather than spreading it evenly. Put the wet and prep work on one run, meaning sink, dishwasher, prep counter and the trash pull-out, and put the hot and cold work on the other, meaning range, hood, refrigerator and the landing space beside each.
Now the person unloading the dishwasher and the person at the range are working on opposite walls, facing away from each other, and the aisle between them is circulation rather than contested space. A galley zoned this way handles two cooks at 48 inches better than a badly zoned one handles a single cook at 60.
It also solves a scheduling problem you would not predict. The sink and the dishwasher share plumbing, so keeping them on one run keeps the plumbing on one wall, which is cheaper and avoids running supply and drain across or under the aisle.
3. Make one run shallower
Here is the move that buys real inches. Standard base cabinets are 24 inches deep, about 25 to 25.5 inches once the countertop overhangs. But base cabinets are also available at 21 and 18 inches deep, and on the run that does the lighter work, you rarely miss the difference.
Take the prep and cooking run at full 24 inch depth, because that is where you need landing space beside appliances. Take the opposite run down to 18 inches. You have just converted roughly 6 inches of cabinet into 6 inches of aisle, which turns a 40 inch aisle into a 46 inch one. In a galley, 6 inches is the difference between squeezing past someone and walking past them.
One constraint to plan around: a standard dishwasher needs a full 24 inch deep cabinet, so it stays on the deep run. That pairs naturally with idea 2, since the dishwasher belongs on the wet run anyway.
Reduced-depth cabinets are not custom work. They are a standard modification in the semi-custom tier, which is one of the practical reasons that tier tends to suit difficult rooms. We go through what each tier does and does not allow in our guide to stock, semi-custom and custom cabinets.
4. Choose a counter-depth refrigerator
A standard-depth refrigerator runs roughly 31 to 36 inches deep before you count handles, which means it projects 6 inches or more past a 25 inch counter. In a galley that bulge lands right in the aisle, and because refrigerators are tall, it reads as a wall rather than a step.
A counter-depth unit sits at roughly 24 to 32 inches, close to flush with the cabinet run. You lose some interior volume, and the trade is real, but you gain a clean uninterrupted line down the whole length of the kitchen, which is worth more in a galley than in any other layout.
Two things to check before ordering. Counter-depth models are frequently wider or taller to recover the capacity they give up on depth, so verify the cutout width and height, not just the depth. And check the door swing: a full-width French door in a narrow galley can collide with the opposite run even when the body of the appliance fits.
5. Stagger the appliances that face each other
This is the galley-specific rule, and it has a planning guideline behind it that most plans never check. The NKBA guidelines state plainly that appliance doors should not interfere with each other. In a galley, the two runs face off, so every appliance on one wall has something directly opposite it.
Run the numbers and the problem is obvious. A dishwasher needs 27 to 30 inches in front of it to open the door and load the lower rack. In a 42 inch aisle, that leaves 12 to 15 inches on the other side, which is below the 21 inch standing space the guidelines ask for at a dishwasher and nowhere near enough to pass. An oven door is similar. Two of them opposite each other means only one can be open at a time, and whoever is using it blocks the kitchen.
The fix is placement, not dimension. Offset the dishwasher from whatever is opposite it, so an open door faces a stretch of cabinet front rather than another appliance. Put the oven and the refrigerator on the same run rather than across from each other. And never place a dishwasher directly opposite an oven in a galley under 48 inches, because a holiday meal will have both open at once.
6. Run one continuous countertop the full length
Now the visual half, and the first one does the most work.
A galley has one dominant axis, and anything that reads continuously along that axis makes the room read longer. A countertop in a single material, running the full length of a run with no interruption, is the strongest available line. Break that run with a different material around the range, or a seam placed mid-wall, and you have cut the long dimension into two short ones.
Practical version of this: carry the countertop material up as the backsplash behind at least one run, and keep the run itself uninterrupted by any change of color or texture. Where a cooktop sits in the counter, let the counter pass behind it rather than framing it in something else.
7. Make the two walls asymmetrical
A galley with full height wall cabinets on both runs is a tunnel, and no amount of light fixes it. The geometry is doing it.
Break the symmetry. Take one run to the ceiling with full cabinetry, which is the storage run and carries the weight. Then keep the opposite run visually light: open shelving, a single shallow upper, or nothing above the counter at all. The eye reads the lighter wall as recessed and the room as wider than it measures.
The same trick in color. A darker or heavier treatment on one run with a lighter one opposite reads as depth. Both runs in the same heavy finish reads as a corridor.
This is also where the shallower run from idea 3 pays twice, because the shallow run is the natural candidate for the lighter treatment.
8. Run the flooring down the long axis
Small, cheap, and it genuinely works. Plank flooring laid parallel to the long axis of the galley carries the eye down the length of the room. Laid across the aisle, each board becomes a horizontal rung and the room reads as a ladder, shorter and narrower than it is.
Tile follows the same logic. A rectangular tile laid with its long edge along the axis, or a pattern with a directional run, beats a grid. And the fewer transitions you put in the floor, the better. Carrying the same flooring through the open end of the galley into the next room is one of the most effective things you can do, because the floor stops announcing where the kitchen ends.
9. Light the length, not the middle
The default galley lighting is a single fixture in the center of the ceiling, and it is the worst possible choice. It lights the middle of the aisle, leaves both ends dim, throws your own shadow onto every counter you work at, and visually shortens the room by marking its center.
Light the axis instead. A run of recessed fixtures spaced down the length, or a linear fixture following the long dimension, pulls the eye end to end. Then light the work surfaces separately with continuous under-cabinet lighting along both runs, which removes the shadow problem and makes the counters read as surfaces rather than dark bands.
The payoff is at the far end. A galley is dim at the ends because the walls are close and there is usually only one window. Putting deliberate light at the far end, whether a fixture, a lit open shelf, or a window left unobstructed, makes the room resolve as a space with a destination rather than a passage that stops.
Putting the nine in order
If you are working with a fixed budget or a fixed room, the sequence matters more than the list.
| Priority | Idea | What it decides |
|---|---|---|
| 1 | Aisle width | Whether the kitchen is usable at all |
| 2 | Zoning the two runs | Whether two people can be in it |
| 3 | Reduced depth on one run | Buys aisle you cannot otherwise get |
| 4 | Counter-depth refrigerator | Removes the biggest visual obstruction |
| 5 | Staggering appliance doors | Whether the aisle stays open in use |
| 6 | Continuous countertop | Reads as length |
| 7 | Asymmetrical walls | Removes the tunnel effect |
| 8 | Flooring direction | Reads as length, costs nothing |
| 9 | Lighting the axis | Resolves the ends |
The first five are decided in the plan and cannot be changed later without demolition. The last four can be adjusted during construction or even afterward. Spend the planning time on the top half.