Cabinets are usually the largest single line in a kitchen remodel, and they are the one homeowners feel least equipped to evaluate. Showrooms do not help much. Two doors that look identical across a display floor can differ by a factor of three in price, and nothing visible on the front of the door explains why.
The difference is almost never the door. It is the tier you are buying in, what the box is made of, and how the finish was applied. This guide covers those three, in the order that actually determines your budget.
Quick answerKitchen cabinets come in three tiers. Stock is pre-built in fixed sizes, widths starting at 9 inches and stepping in 3 inch increments, available fast and cheapest. Semi-custom is made to order from a manufacturer's catalog with modifications allowed, which is where most quality remodels land. Custom is built to your dimensions with no size restrictions and the longest lead time. Tier is a separate question from box construction and from door style, and confusing the three is the most common way homeowners overpay.
- Three decisions people treat as one
- The three tiers
- How to read a cabinet box
- The one certification worth knowing
- Finishes, and why white cabinets go yellow
- Cabinet types by function, and the sizes that constrain your layout
- Where style fits
- Where the money actually goes
- Frequently asked questions
- Spend on what you cannot change later
Three decisions people treat as one
Almost every confusing cabinet conversation comes from collapsing three independent choices into a single question. Separate them and the pricing starts making sense.
The three tiers
| Stock | Semi-custom | Custom | |
|---|---|---|---|
| Sizing | Fixed widths from 9 in, in 3 in steps to 48 in | Catalog sizes, modifiable. Some makers step in 1 in, others 3 in | Any dimension |
| Modifications | None. What is on the shelf is what you get | Depth, height, width and some interior changes, within the maker's rules | Anything, including the box itself |
| Lead time | Days. Sometimes same day | Made to order, typically several weeks | Longest, made to order in a shop |
| Materials | Usually melamine or veneered panel | Broader range, real wood doors common | Any species or engineered material |
| Finish | Limited catalog colors | Wide catalog, some custom matching | Unlimited, including specialty and distressed |
| Typical planning range | Roughly $160 to $380 per linear foot | Between the two, and it climbs quickly with modifications | Roughly $600 to $2,500 per linear foot |
Those ranges are 2026 planning figures for cabinetry only. Installation, countertops, and hardware are separate.
Stock makes sense when the layout is simple, the walls are reasonably square, and the schedule is short. The compromise is filler. Because stock steps in 3 inch jumps, a run that measures 94 inches gets built from cabinets totaling 90 inches plus two filler strips, and those strips are dead space you paid for and cannot use.
Semi-custom is where most serious remodels land, and it is the tier most worth understanding. You are ordering from a catalog, but the catalog allows changes: a base cabinet reduced in depth to clear a radiator, a wall cabinet built taller to meet a 9 foot ceiling, a specific interior fitting. The caution is that modifications are priced individually and they compound. It is entirely possible to modify a semi-custom order past the price of custom while still living inside the catalog's constraints. If your list of changes is getting long, price both.
Custom earns its cost in two situations. The first is a difficult house: out of square walls, unusual ceiling heights, a chimney chase or a stair bulkhead that a catalog cannot accommodate. The second is when you want something the catalog does not make, whether that is a specific wood, a furniture-grade detail, or a piece built to a dimension that does not exist in 3 inch increments. Custom in an ordinary rectangular kitchen is often money spent on flexibility you will not use.
How to read a cabinet box
This is where the real quality difference lives, and it is visible in about thirty seconds if you know where to look. Open a sample door at the showroom and check these.
Box material. Plywood is the better box, and the reason is mechanical rather than snobbery. Its cross-laminated plies hold screws far better than a pressed panel, which matters at every hinge plate and every wall mounting screw, and it tolerates ambient humidity swings without swelling. Look for three-quarter inch sides and shelves. Particleboard is not automatically disqualifying in a low-traffic space, but its screw threads strip more easily, a raw edge wicks water if a dishwasher ever leaks, and a long shelf span will sag before a plywood one does.
MDF is a different case, and worth being clear about. It is a poor box side and the best substrate for a painted door, because it machines cleanly and has no grain to telegraph through paint. A quality painted cabinet with MDF doors on plywood boxes is a deliberate and correct choice, not a compromise.
The back panel. This is the single most reliable tell. A full half inch back panel captured in a groove makes the box rigid and gives you something to screw into anywhere along the wall. A thin sheet stapled onto the back edges does neither. Reach in and press the back. If it flexes, you know the tier.
Shelves. Three-quarter inch, and adjustable. A half inch shelf carrying a run of dinner plates across a 36 inch span will bow within a couple of years.
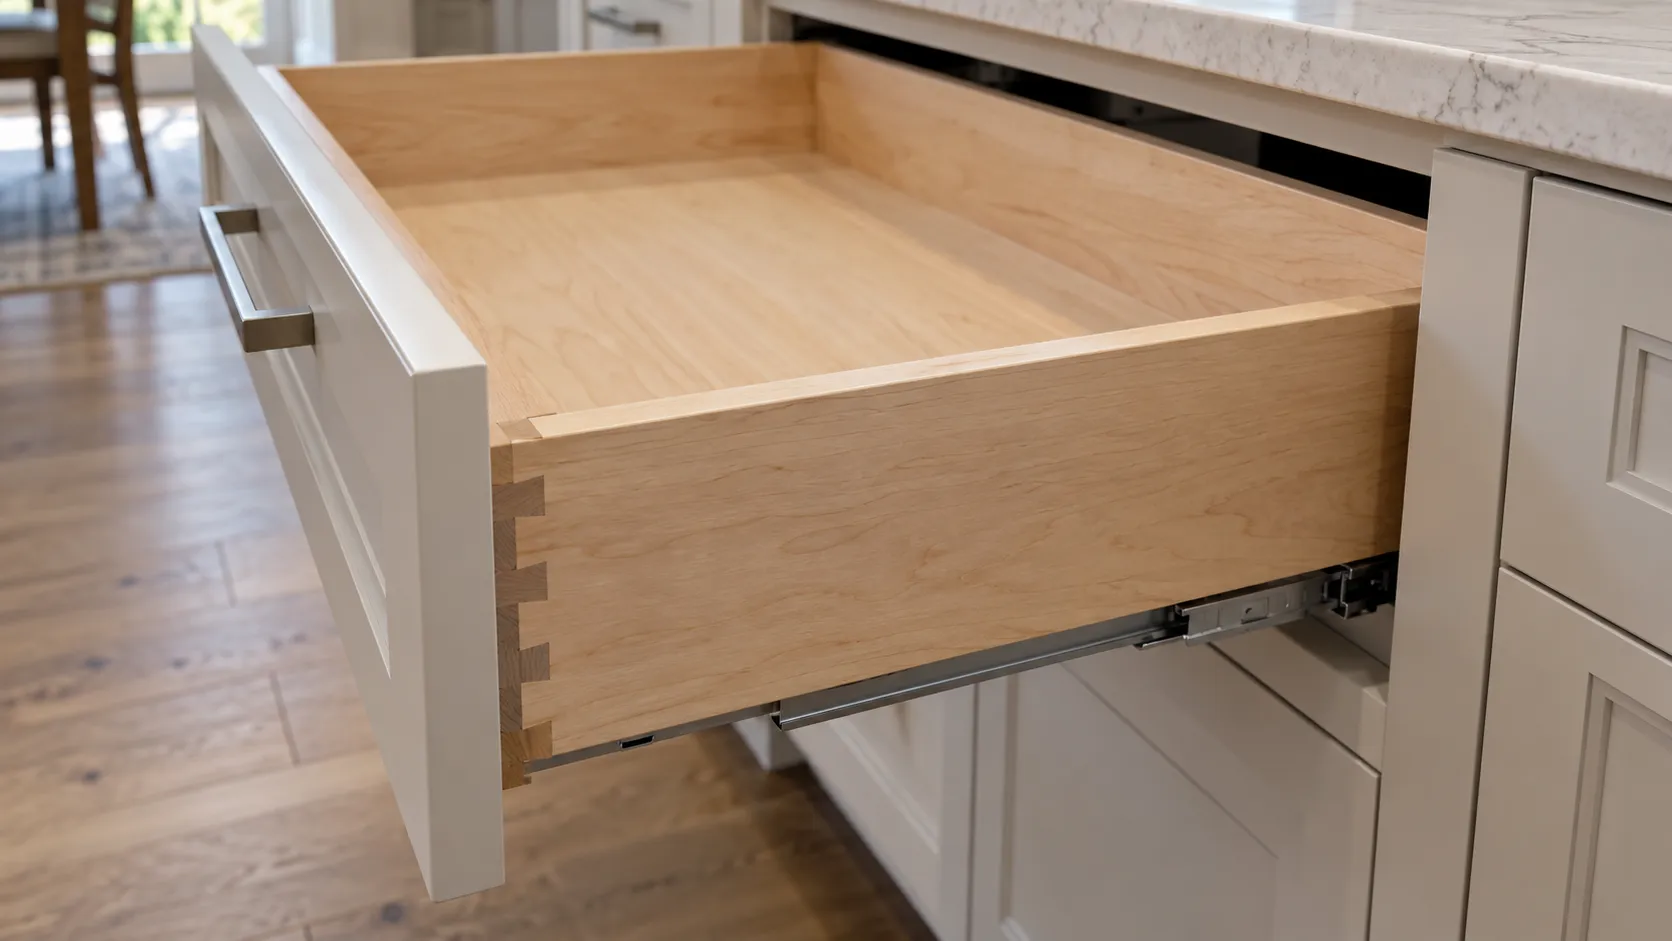
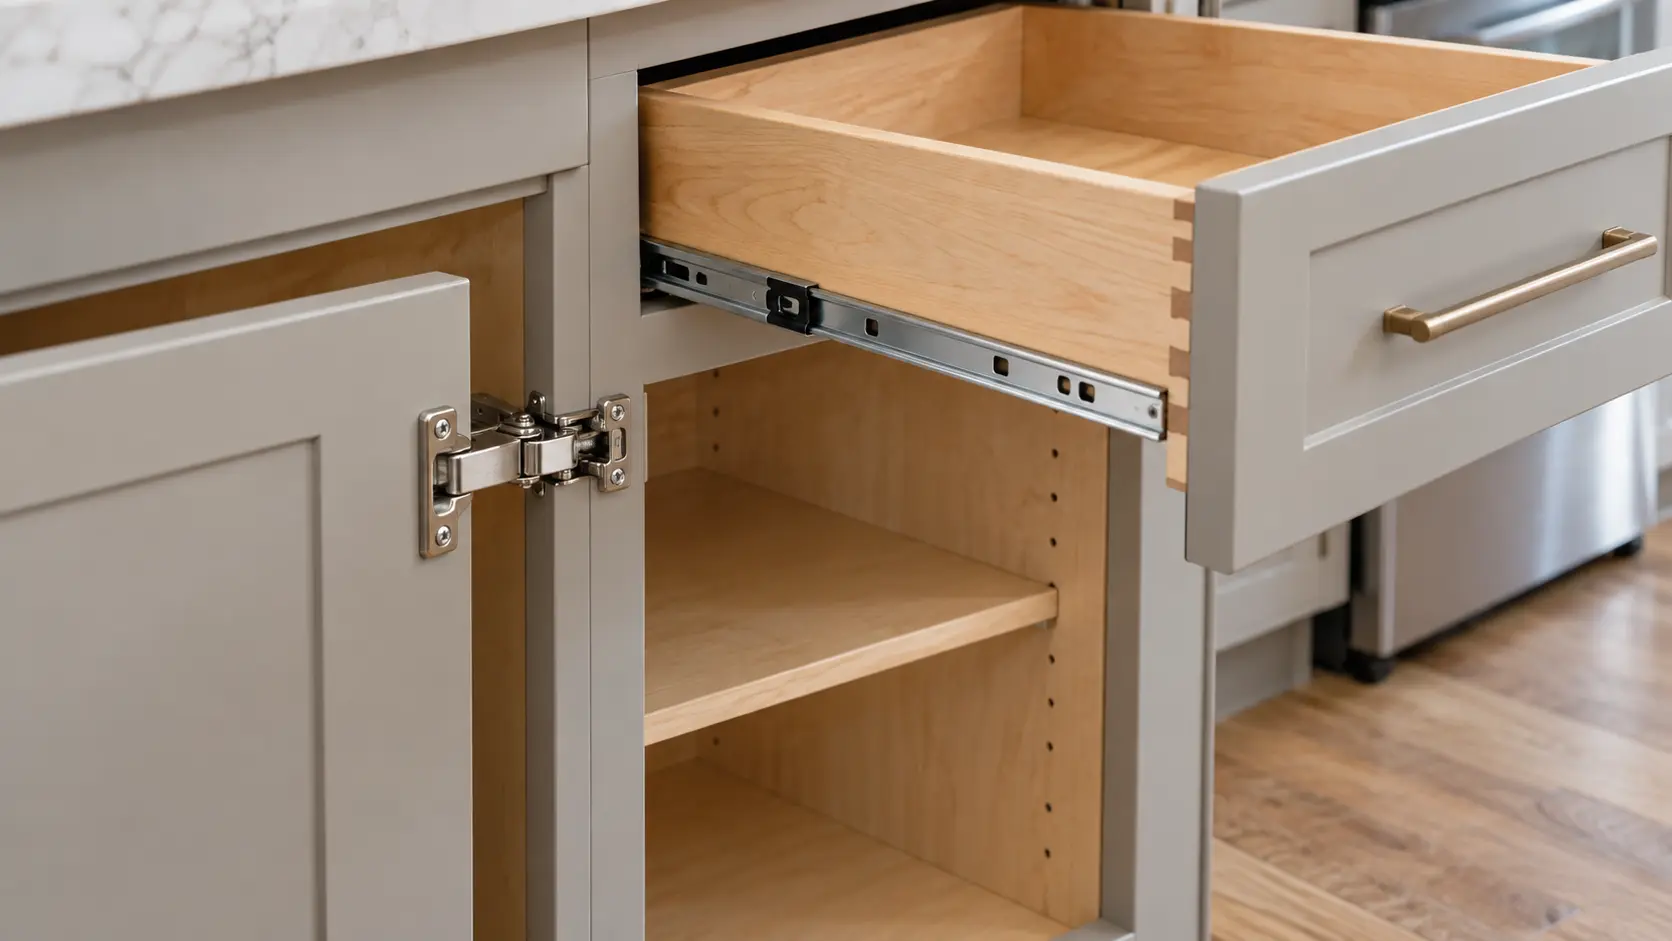
Drawer boxes. Look at the back corner of a fully extended drawer. Dovetail joinery, where the interlocking fingers carry the load mechanically, is the mark of a well built drawer. Stapled butt joints rely on the fastener alone and loosen with use. Solid wood or plywood beats a wrapped particleboard box.
Glides. Undermount, full extension, soft close. Full extension matters more than people expect, because a three-quarter extension drawer permanently hides its back six inches from you. Side-mount epoxy glides are the budget marker.
The one certification worth knowing
Most cabinet marketing is adjectives. There is one exception, and it is genuinely useful when comparing lines across brands.
ANSI/KCMA A161.1 is a performance and construction standard for kitchen and vanity cabinets, and it is the only performance standard specific to this product category. Certified cabinets are independently tested rather than self-declared, which is the part that matters. The tests are unusually concrete:
| Test | Requirement |
|---|---|
| Shelf and bottom loading | 15 lb per square foot, held for 7 days, without excessive deflection or joint separation |
| Wall cabinet mounting | Loaded gradually to 600 lb to prove the mounting system |
| Base front joints | 250 lb applied to cabinet-front stiles, or 200 lb where there is no drawer rail |
| Door impact | A 10 lb sandbag struck against the door center, both closed and at 45 degrees open |
| Door endurance | 25,000 full 90 degree open and close cycles with no loss of function |
| Door static load | 65 lb applied, cycled 10 times between 90 and 20 degrees, with no hinge damage |
| Drawer endurance | Loaded to 15 lb per square foot and operated through 25,000 cycles |
| Finish, heat and humidity | 24 hours at 120 degrees F and 70 percent humidity with no discoloration or blistering |
| Finish, thermal cycling | Five cycles alternating an hour at 120 degrees F and an hour at minus 5 degrees F |
| Finish, chemical | 24 hour exposure to vinegar, juice, coffee, oil and alcohol, plus an hour of mustard, without staining |
Twenty five thousand door cycles is roughly twenty years of ordinary use. The construction requirements attached to the standard also specify wood moisture content of 10 percent or less, which is the kind of detail that prevents doors from moving seasonally after they are installed.
Certification is not a guarantee of luxury, and plenty of excellent custom shops do not carry it because it is built for production lines. But when you are comparing two catalog lines and the salesperson is describing both as "solid construction," asking which one is certified is a question that gets a real answer.
Finishes, and why white cabinets go yellow
Finish is where a lot of money quietly separates good cabinets from cheap ones, and it is invisible on day one.
Nitrocellulose lacquer is the traditional spray finish. It builds fast and repairs easily, but it carries only around 12 to 18 percent solids, so it needs many coats, and it ambers as it ages. On a white kitchen that shows.
Conversion varnish is a post-catalyzed finish, meaning a hardener is mixed in immediately before spraying and the film cures chemically rather than just drying. At roughly 40 to 60 percent solids it builds far more film per coat and resists heat, solvents and household acids much better. The catch is that it cannot be applied in the field. It requires controlled mixing ratios and controlled temperature during cure, which is why it is a factory finish and why refinishing existing cabinets never quite matches a factory-finished door.
Polyurethane is durable and widely used, but it also ambers over time, particularly on surfaces that get direct sun.
The practical consequence for anyone choosing white: yellowing is a property of the coating chemistry, not the paint color. If a bright white is central to your kitchen, ask specifically what the finish system is and whether it is a non-yellowing formulation, and ask to see a sample that has been in service rather than a fresh door. A south-facing window will find the answer for you in about three years either way.
Cabinet types by function, and the sizes that constrain your layout
Beyond tier and construction, cabinets are categorized by where they go, and their standard dimensions quietly shape what a layout can do.
- Base cabinets sit on the floor, standard 24 inches deep and 34.5 inches high, which brings them to 36 inches with a countertop on top.
- Wall cabinets hang above, commonly 12 to 15 inches deep, in heights of 30, 36 or 42 inches depending on ceiling height and whether you are running them to the ceiling.
- Tall cabinets, meaning pantries and oven housings, generally run 84, 90 or 96 inches high to align with the wall cabinet tops.
- Specialty cabinets cover corner units, drawer bases, appliance garages, tray dividers and pull-outs. These are where a layout gets genuinely more usable, and we cover the ones worth the money in our guide to custom kitchen storage features.
The sizing increments matter more than they sound. A layout drawn without reference to available cabinet widths will come back from the shop full of filler strips. This is one of the quiet advantages of designing and building under one roof: the layout is drawn against real cabinet dimensions from the start.
Where style fits
Door style and overlay are real decisions, but they belong after the ones above, and they are covered properly elsewhere rather than summarized thinly here.
Whether the door sits inside the face frame or on top of it changes cost, usable interior volume, and hinge type, and we work through that in inset versus full overlay cabinetry. If you are heading toward a painted Shaker kitchen, the door anatomy, the choice of white, and how to keep it from reading builder-grade are in white Shaker kitchen design ideas.
Where the money actually goes
If you have a fixed budget, this is the order we would spend it in.
- Box material and back panel. A plywood box with a captured back is the one thing you cannot upgrade later without replacing the cabinet.
- Drawer boxes and glides. Dovetailed boxes on full extension soft close undermounts. You touch these every day, and they are the first thing that feels cheap.
- Finish system. A factory-applied catalyzed finish outlasts a field-applied one by years, and it is not something you can add afterward.
- Enough drawers. Base cabinets with drawers instead of doors and a fixed shelf change daily use more than any style decision. This is a layout choice made at order time.
- Then door style, color and hardware. These are the visible decisions and the ones worth the least. Hardware in particular can be changed in an afternoon for a few hundred dollars.
The reason to spend in that order is simple. Everything above the line is permanent and hidden. Everything below it is visible and reversible. Most cabinet regret comes from having done it backward.